Arguments
Argument types are datatypes that we can use instead of strings.
Paper's command system is still experimental and may change in the future.
Basic usage of arguments
You can add arguments to a command by doing the following:
public class YourPluginClass extends JavaPlugin {
    @Override
    public void onEnable() {
        LifecycleEventManager<Plugin> manager = this.getLifecycleManager();
        manager.registerEventHandler(LifecycleEvents.COMMANDS, event -> {
            final Commands commands = event.registrar();
            commands.register(
                Commands.literal("enchantmentargumentcommand")
                .then(
                    Commands.argument("enchantmentargument", ArgumentTypes.resource(RegistryKey.ENCHANTMENT))
                        .executes(ctx -> {
                            ctx.getSource().getSender().sendPlainMessage(
                                ctx.getArgument("enchantmentargument", Enchantment.class).getKey().asString()
                            );
                            return Command.SINGLE_SUCCESS;
                        })
                ).build()
            );
        });
    }
}
This command has one argument of the Enchantment datatype. When the command is executed, the command
sender will get a message containing the key of the enchantment they selected.
Advantage over string-based arguments
- Direct conversion to usable type
- Client-side error handling
- Custom types
- Non alphanumerical sorting
Enchantment types
By default, you can use the registry API to get simple argument types like blocks, items, potions and many more. In the example above, we used the Enchantment Argument type, but there are many others:
Predefined types (Registry)
| Registry key name | Return datatype class | Description |
|---|---|---|
| GAME_EVENT | GameEvent | Events in the game (eating, flying with an elytra etc.) |
| STRUCTURE_TYPE | StructureType | Structures |
| INSTRUMENT | CraftMusicInstrument | Note block instrument |
| ENCHANTMENT | Enchantment | Enchantment type |
| MOB_EFFECT | PotionEffectType | Potion effect |
| BLOCK | BlockType | Block type - not modifiable |
| ITEM | ItemType | Item type - not modifiable |
| BIOME | Biome | Biome type |
| TRIM_MATERIAL | TrimMaterial | Materials used to trim armor |
| TRIM_PATTERN | TrimPattern | Trim patterns |
| DAMAGE_TYPE | DamageType | All types of damage dealt to an entity |
| WOLF_VARIANT | Wolf.Variant | Wolf variants since 1.20.5 |
| PAINTING_VARIANT | Art | All paintings |
| ATTRIBUTE | Attribute | Entity attribute |
| BANNER_PATTERN | PatternType | Armor Pattern type |
| CAT_VARIANT | Cat.Type | Cat variants |
| ENTITY_TYPE | EntityType | Every entity type |
| PARTICLE_TYPE | Particle | Every particle type |
| POTION | PotionType | Every potion type |
| SOUND_EVENT | Sound | Events that trigger sound effects |
| VILLAGER_PROFESSION | Villager.Profession | Villager professions |
| VILLAGER_TYPE | Villager.Type | Villager biome specific type |
| MEMORY_MODULE_TYPE | MemoryKey | Keys for saving per-entity data |
| FROG_VARIANT | Frog.Variant | Frog variants |
| MAP_DECORATION_TYPE | MapCursor.Type | Types of sprites displayed on a map |
| FLUID | Fluid | Fluid types |
Brigadier itself also specifies many argument types. For more information on them, see ArgumentTypes
Custom types
Custom arguments can be created by implementing the CustomArgumentType interface.
Now, let's say that we want to implement a command which lets you order ice cream. For that, we add an enum that specifies all available values for our custom type.
public enum IceCreamType {
    VANILLA,
    CHOCOLATE,
    STRAWBERRY,
    MINT,
    COOKIES
}
Now, we have to define the argument itself. We do this by implementing the CustomArgumentType.Converted interface:
public class IceCreamTypeArgument implements CustomArgumentType.Converted<IceCreamType, String> {

    @Override
    public @NotNull IceCreamType convert(String nativeType) throws CommandSyntaxException {
        try {
            return IceCreamType.valueOf(nativeType.toUpperCase());
        } catch (Exception e) {
            Message message = MessageComponentSerializer.message().serialize(Component.text("Invalid flavor %s!".formatted(nativeType), NamedTextColor.RED));

            throw new CommandSyntaxException(new SimpleCommandExceptionType(message), message);
        }
    }

    @Override
    public @NotNull ArgumentType<String> getNativeType() {
        return StringArgumentType.word();
    }

    @Override
    public <S> CompletableFuture<Suggestions> listSuggestions(CommandContext<S> context, SuggestionsBuilder builder) {
        for (IceCreamType flavor : IceCreamType.values()) {
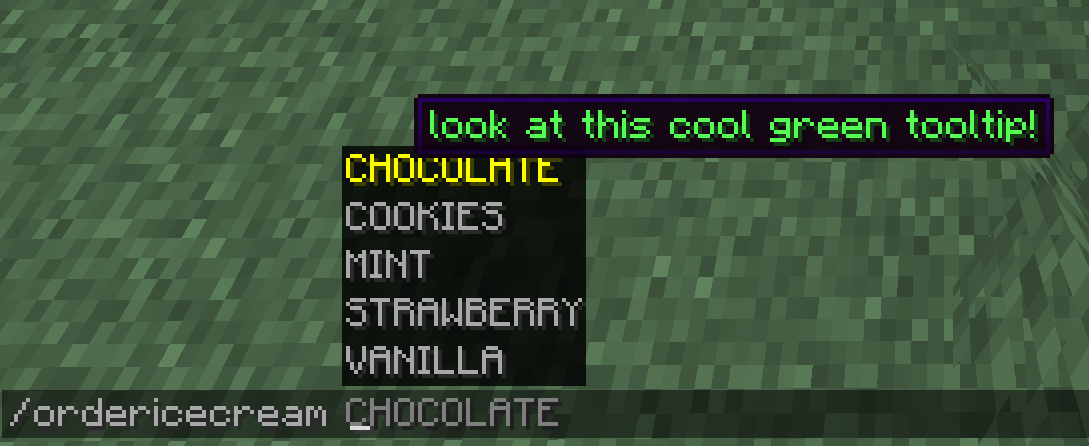
            builder.suggest(flavor.name(), MessageComponentSerializer.message().serialize(Component.text("look at this cool green tooltip!", NamedTextColor.GREEN)));
        }

        return CompletableFuture.completedFuture(
                builder.build()
        );
    }
}
That's a lot of code, so let's start from the top. We implemented the CustomArgumentType.Converted
interface. This interface takes two type arguments: our custom enum, T, and a type that is native to
Minecraft, such as String, Integer, etc., called N. The native type exists so that the client can use
the input data, as it doesn't know what our custom IceCreamType is.
The first method called convert() converts the native type (in this case String)
into our own custom type called IceCreamType, as the name suggests. This is so we
can keep using our custom type internally. If we wouldn't do that, there would be no point in using a
custom type. If the specified input isn't found in our enum of available flavors, we
output an error.
The second method called getNativeType() returns the type of string that our command argument uses.
In our case, we're using a single word, so we return StringArgumentType.word().
In the last method, listSuggestions(), we return CompletableFuture<Suggestions> so that the client
can suggest all available options. We can even add tooltips to the suggestions to explain them in greater
detail.
As a last step, we need to register the Command:
public void onEnable() {
    LifecycleEventManager manager = this.getLifecycleManager();
    manager.registerEventHandler(LifecycleEvents.COMMANDS, event -> {
        final Commands commands = event.registrar();
        commands.register(Commands.literal("ordericecream")
            .then(
                Commands.argument("flavor", new IceCreamTypeArgument()).executes((commandContext -> {
                    IceCreamType argumentResponse = commandContext.getArgument("flavor", IceCreamType.class);
                    commandContext.getSource().getSender().sendMessage(Component.text("You ordered: " + argumentResponse));
                    return 1;
                }))
            ).build()
        );
    });
}
Now that we have registered the command, we can execute it ingame:
 Look, we can even see our tooltip and if we execute the command, we get the message we specified
